martes, 24 de enero de 2012

Back heel¡¡¡¡¡

Okay..is a lot of work but...is more pleasant to make the shoe by hand.
My theory is:If one person build that prop in the past (about year 1995??) for the film "BACK TO THE FUTURE", NOW at 2012 the techniques and process is more easy,and my experience today is better than twenty years ago¡¡

fo the back heel I use Super Sculpey clay. I made two pieces, left and right.
I showed all the process for the right piece.
Starting now¡¡¡
Pepakura model obtain of a simple 3d model. My 3d models have all the finest details ,included the back heel, but for pepakura models is better to remove unnecesary details.


Uhh ..ohhh NOOO its burned¡¡¡ do not put over 130 degrees¡¡¡¡

first prototype, first test in oven, good material¡¡¡¡


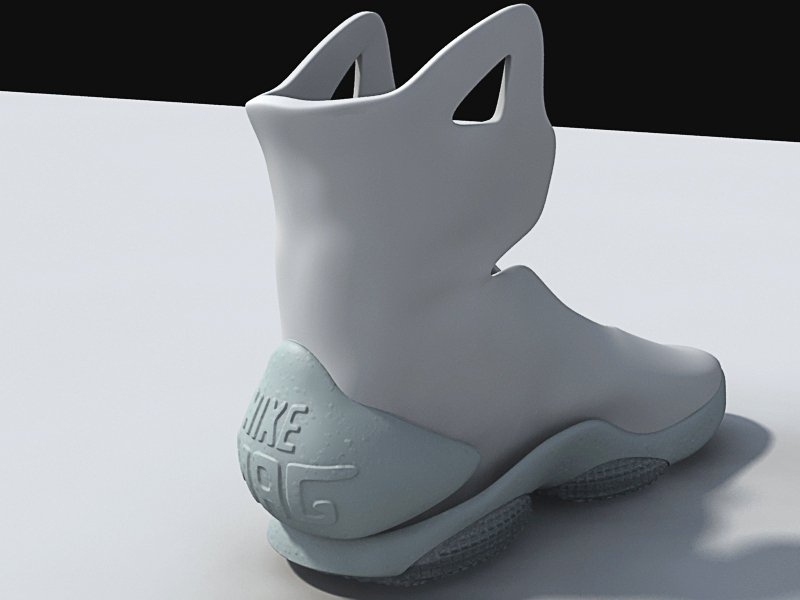
logos modelled by hand,a proof of patience.

 Adding a bump to the surface,one of the first paint bump tests¡¡¡¡


Making the "three part" mold.Authentic nightmare¡¡¡¡
And here is the video:

Untitled from manu R on Vimeo.


Untitled from manu R on Vimeo.


And here is the video of the mold opened for the first time:


Untitled from manu R on Vimeo.
Adding carefully by hand a urethane colors on the logos with the brush
My mold ended, just injecting a gray urethane rubber¡¡¡the drinking pipes was for the exit holes of the urethane excess. 
The heel with the tails of the injection mold.

First prototype made with polyurethane, to test the mold and all the exit holes.


In that photo you can see all the process, from first to the last prototype.

That is the last prototype made with urethane, I preparing a new piece made with a material more rigid.at now I use a shore hardness A17 and I need a Shore A50.I post more updates soon.

Red,yellow and green¡¡¡¡¡¡¡¡¡

Well, The handmade process started¡¡¡

All the pieces mas modelled with Super sculpey.For me is a perfect thing to model and sanded,good material.


Other good tool was Pepakura¡¡¡ pepakura is used for made a lot of props (like iron man helmet) the program is very easy.You import a 3D model and the program convert it to a cuttable paper.Something like that:

That technique was used for the back of the shoe.


with that piece, I model a wall around that piece and fill the hole with dental plaster:
And the piece finished is painted with several layers.The paint is applied with airbrush and the paint is carpaint,beacuse dries Fast¡¡¡the piece is sanded with a driller and handmade way.the final piece prepared for a mold is that:

The transparent walls was CD cases¡¡¡ the next step is refill with RTV silicone rubber for molds.the mold is a two part and is ready to inject with any polyester compound or epoxy.In that video you can see the mold developing of the transparent piece of the left shoe.

Untitled from manu R on Vimeo.


The finished process of moulding is something like that:
The mold have two  holes and in that hole I inject a transparent  "occlussion polyester" when I open the mold, the piece is like glass, but later is sanded to obtain a "frosted glass" appearance.See video, its like glass¡¡

Untitled from manu R on Vimeo.


the final appearance is:


The next part is the developing of the back heel piece¡¡¡¡


How to started???

First of all...sorrry for my English.Maybe some phrases sounds badly...

Hi, my blog is about DIY a sneakers... a famous sneakers appeared at back to the future movie¡¡¡¡ most of us received happylly the reissure of the nike mags but.... the price and the number of copies (1500 in auction) was the first problem to obtain a pair...but.... if....if I can??
Can I made my own shoes??....yes I can.
I started that project like a joke, but little by little I envolved in the process of developing.
My first idea was 3D modelling(I work in visual effects industry) and 3D printing.That technique is fast, but my head continously reminds me: when you was younger, you made all by hand¡¡¡¡
I decided to made my own Mags by hand and by 3Dprinting. Two different techniques, to made my exact copy.


All the references was in my :Back to the future Bluray edition¡¡ Observe,look fine details, proportions and the finger over pause button to see all details.